

Wallet signatures with XMTP
Learn about the types of wallet address signatures you might be prompted to provide when using apps built with XMTP. These signatures are always made with a specific wallet address controlled by your wallet.
First-time app installation use
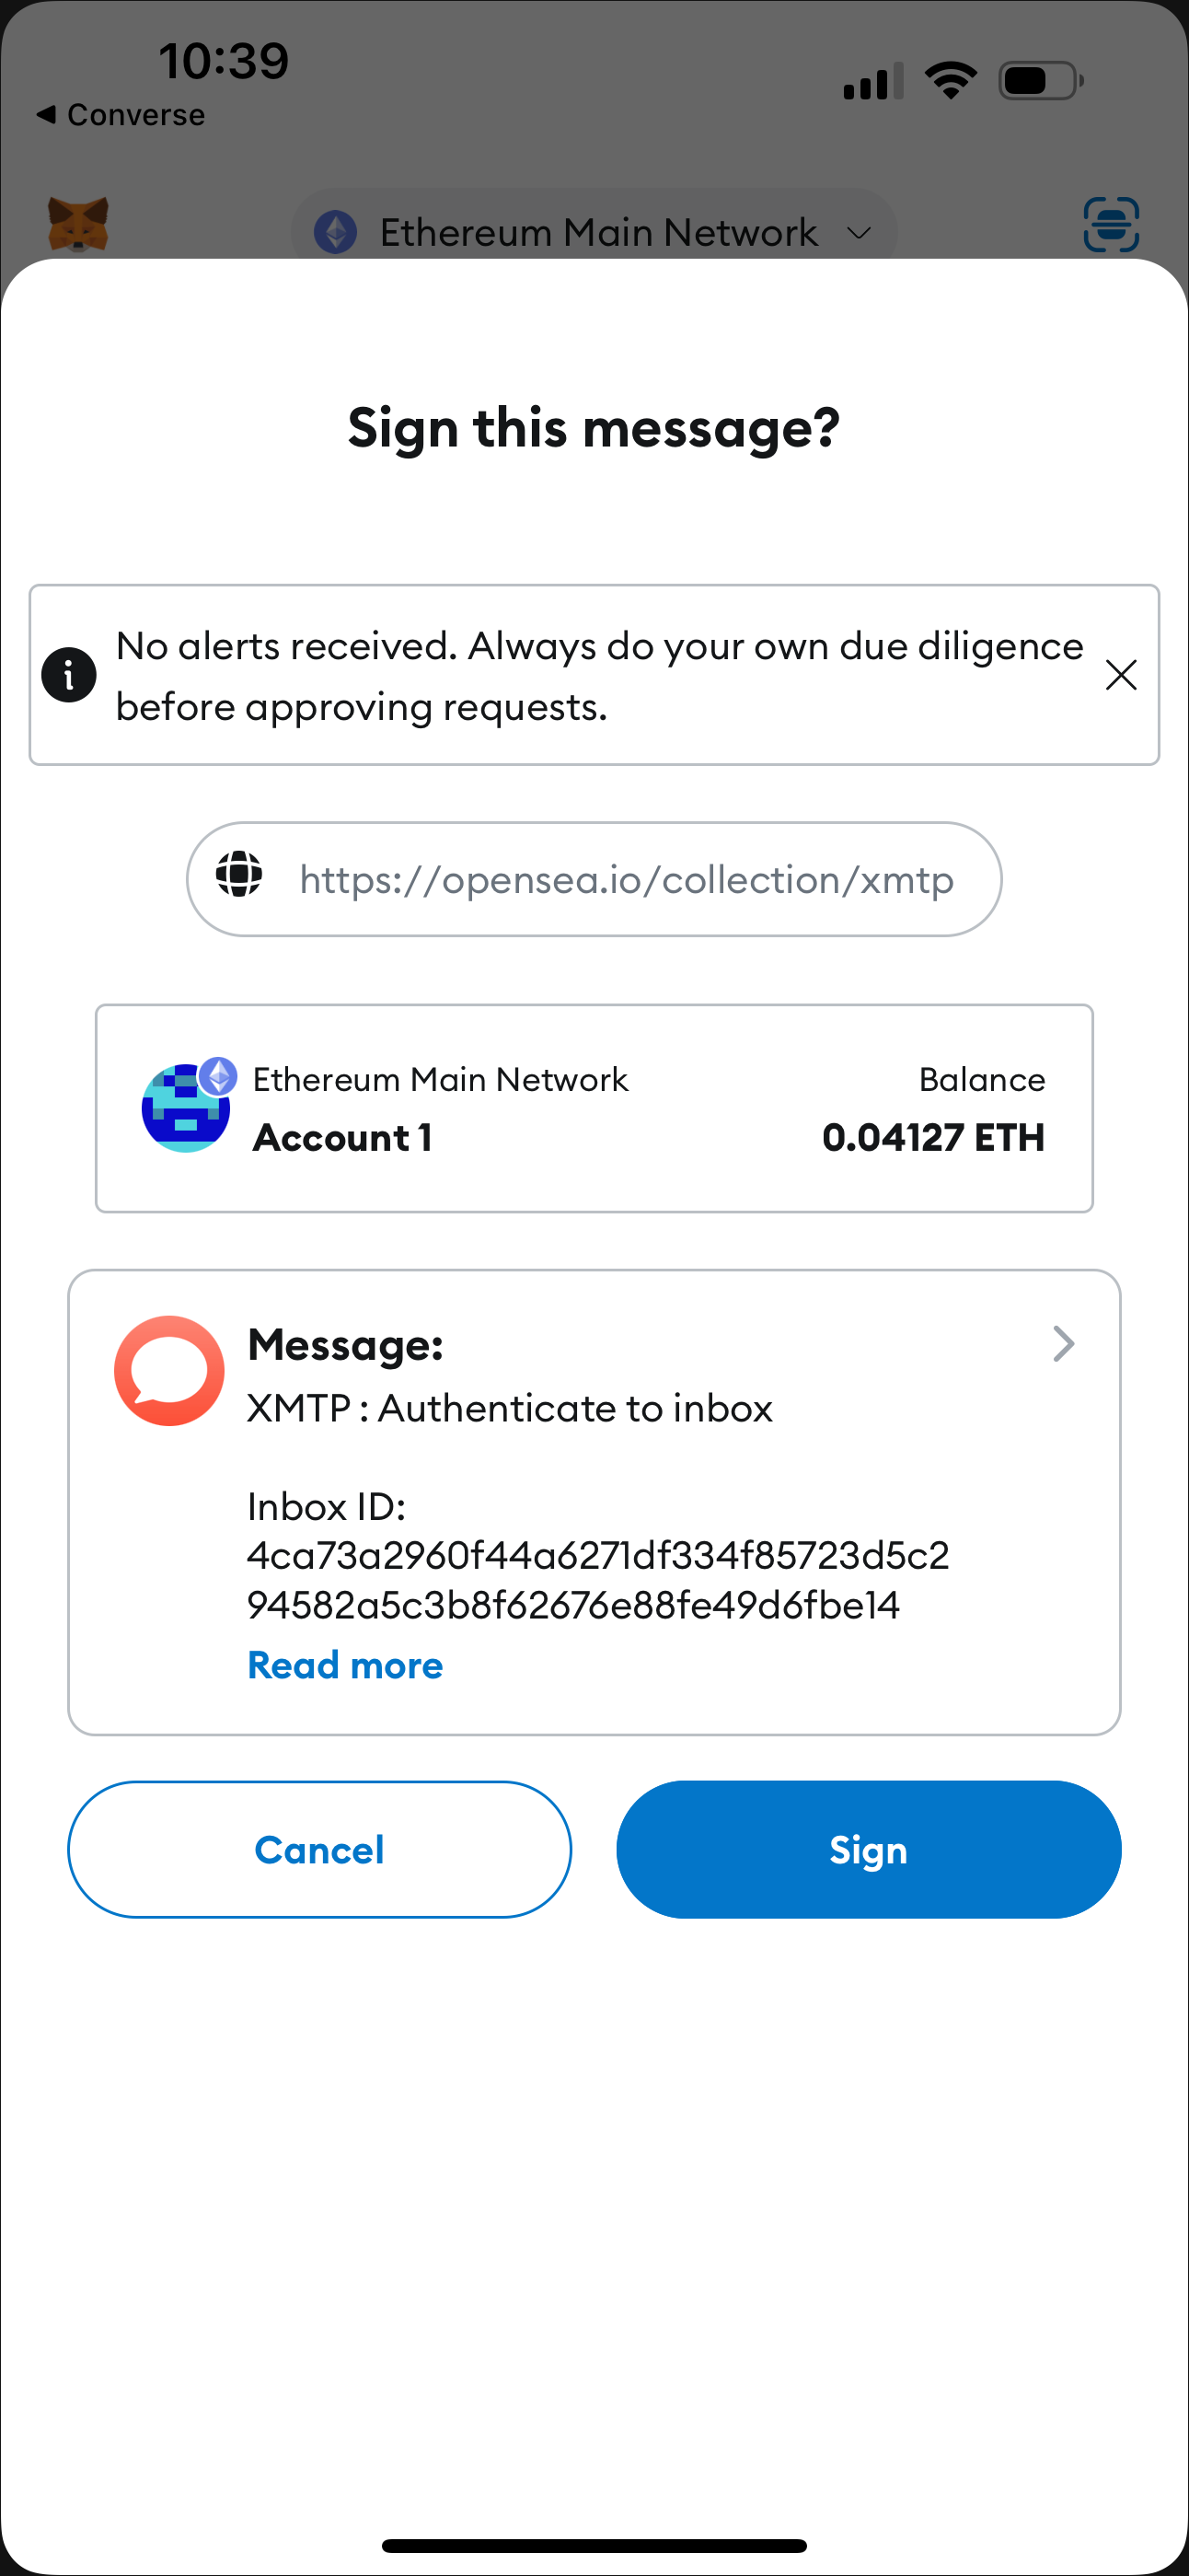
The first time you use an installation of an app built with XMTP, a Sign this message? window displays to request that you sign an XMTP : Authenticate to inbox message. For example:
XMTP : Authenticate to inbox

Inbox ID: ${INBOX_ID}
Current time: ${YYYY-MM-DD HH:MM:SS UTC}
More specifically, the message will request that you sign:
-
A Grant messaging access to app message to grant the app installation access to messaging owned by your signing wallet address. For example:
- Grant messaging access to app (ID: ${hex(INSTALLATION_PUBLIC_KEY)}) -
A Create inbox message to create an XMTP inbox owned by your signing address, but only if you have never used an app installation built with XMTP v3 before. For example:
- Create inbox
  (Owner: ${INITIAL_ADDRESS})
Sign the XMTP : Authenticate to inbox message with your wallet address to consent to the message requests.
Sign to add another address to your inbox
You can add another wallet address to your inbox at any time. For example, you might have started using an app with one wallet address and now want to use the app with an additional wallet address.
If you decide to add another wallet address to your inbox, a Sign this message? window displays to request that you sign an XMTP : Authenticate to inbox message. Specifically, the message requests that you sign a Link address to inbox message. for exasmple:
- Link address to inbox
  (Address: ${ASSOCIATED_ADDRESS})
Sign with the wallet address you want to add to grant it access to the inbox. You can now use your inbox to exchange messages using the wallet address you just added.
Sign to remove address from your inbox
You can remove a wallet address from your inbox at any time.
If you decide to remove a wallet address from your inbox, a Sign this message? window displays to request that you sign an XMTP : Authenticate to inbox message. Specifically, the message requests that you sign an Unlink address from inbox message. For example:
- Unlink address from inbox
  (Address: ${ASSOCIATED_ADDRESS})
Sign with the wallet address you want to remove to unlink it from your inbox. You can no longer access your inbox using the wallet address you removed.
Sign to change inbox recovery address
The first time you used an app installation built with XMTP v3, the wallet address you used to create an inbox is automatically set as the inbox recovery address. You can change the recovery address to a different wallet address at any time.
If you decide to change the recovery address, a Sign this message? window displays to request that you sign an XMTP : Authenticate to inbox message. Specifically, the message requests that you sign a Change inbox recovery address message. For example:
- Change inbox recovery address
  (Address: ${NEW_RECOVERY_ADDRESS})
Sign with the wallet address you want to set as the recovery address to change the recovery address.
Sign to consent to receive broadcast messages
When you click a Subscribe button built with XMTP’s consent standards, you're prompted to sign an XMTP : Grant inbox consent to sender message.
For example, here’s the MetaMask Signature request window that displays when clicking the Subscribe button on this example subscription page connected to the XMTP dev network. You typically see Subscribe buttons like this on a web page or in a dapp.

When you click Sign, you're consenting to receive broadcast messages from the publisher at your connected wallet address. You can see the publisher's sending address in the Signature request window.
When you provide consent, you're adding the publisher's address to your personal XMTP allowed contacts list. This enables messages from the publisher to be displayed in your main inbox instead of being treated as a message from an unknown sender and placed in a secondary view.
To learn about XMTP's consent standards, see Understand user consent preferences.
XMTP v2 signatures
Here are signatures you might be prompted to provide when using an app built with an XMTP v2 SDK.
Sign to send and receive messages using apps built with XMTP
The first time you use an app built with XMTP to send and receive messages using a blockchain account (account), you’re prompted to provide two signatures using your account keys:
-
Sign to create an XMTP identity: This is like creating a messaging account associated with your blockchain account.
-
Sign to enable an XMTP identity: This is like entering a password to access your messaging account.
Providing these signatures with your account keys doesn’t cost you any Ether.
Let’s dive deeper into the details of what happens behind the scenes when you provide these signatures.
Sign to create an XMTP identity
The first time you use an app built with XMTP to send or receive messages, you’re prompted to sign to create a public identity on the XMTP network.
For example, here’s the MetaMask Signature Request window that displays when connecting to the XMTP Chat app:
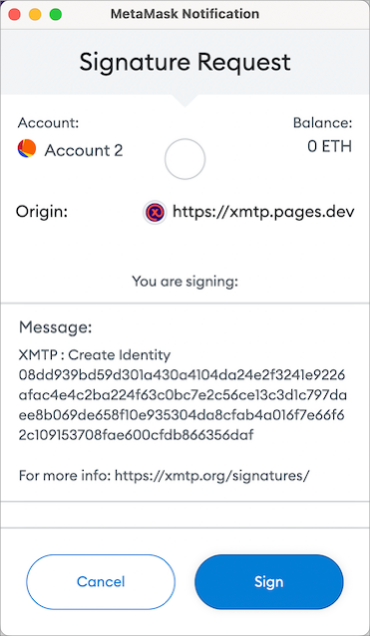
When you click Sign, you're creating an XMTP identity, associated with your account, that you use to send and receive messages on the XMTP network.
More precisely, two things happen:
- XMTP generates a set of keys that you need to send and receive messages on the XMTP network.
These keys are XMTP-specific and different from your account keys. XMTP generates the keys as proxies for your account keys because XMTP can’t (and shouldn’t) use your account keys directly.
These XMTP keys include a public key, which is displayed as a hexadecimal string in the Message section of the signature request window.
This XMTP public key is directly tied to your XMTP identity, is stored and advertised on the XMTP network, and provides the information others need to message you.
To learn more about these keys, see Key generation and usage.
- You sign a message containing your XMTP identity using your account keys.
This signature establishes a relationship between your XMTP identity and your account and enables anyone to verify that your XMTP identity is authentic and controlled by the account you used to sign it.
Once you’ve successfully signed to create an XMTP identity, you’ll never be prompted to do it again for the same account.
Sign to enable an XMTP identity
After you’ve signed to create an XMTP identity (first-time only) and anytime you start a new messaging session using an app built with XMTP, you’re prompted to sign with your account keys to enable your XMTP identity.
For example, here’s the Coinbase Wallet Signature requested window that displays when connecting to the XMTP Chat app:
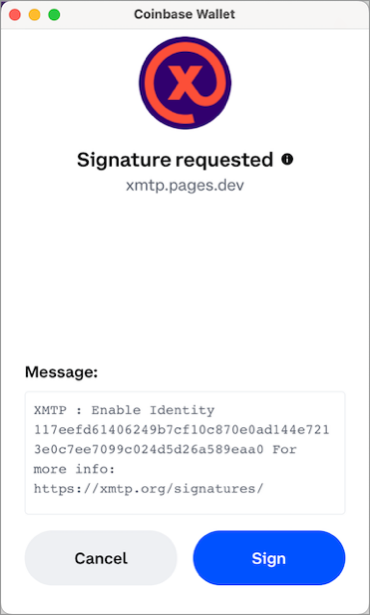
When you click Sign, you're providing a secret, like a password, that enables you to access your messages on the XMTP network.
More precisely, you're using your account keys to sign the randomly generated string of bytes shown in the Message section of the signature request window. Signing the string generates a secret that only you, as the controller of your account, can generate. By enabling you to sign with your account keys to generate this secret, XMTP shields you from having to maintain a password.
The first time you sign to enable an XMTP identity, XMTP uses this secret to encrypt your XMTP identity’s private keys and then stores the encrypted keys on the XMTP network.
Subsequently, when you sign to enable an XMTP identity, XMTP fetches your encrypted private keys from the XMTP network and uses this secret to decrypt the keys. These private keys are what enable you to access your messages on the XMTP network.
You’re prompted to sign to enable your XMTP identity any time an app built with XMTP needs to fetch and decrypt your private keys to enable you to access your messages.